Showing posts with label Barry M. Show all posts

13 October 2013

I've not dabbled with nail art before for three reasons:

  1. I have a short attention span ( I love a quick dry/minimal coat polish)
  2. I don't have the steadiest hands
  3. I didn't own a nail art pen.....I now do.
Inspired by the beautiful blank Revlon's 050 White On White Nail Enamel* (£6.49) provides, I thought I might get creative. For a beginner I thought it best to keep it simple and I don't have any fancy tools (yet).....so went for 5 dots in a circle to make multi-coloured flowers (think in the style of Mr. Men)
canvas that

I've used Barry M's Nail Art Pen (£4.99)** in black, for the outline. It brings out the design, but also is great for masking wobbly lines and imperfections.
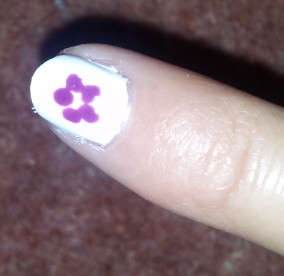
The only issue with using blogs if polish for the flower petals, is that the polish is quite thick, which takes a while to dry - and as the pen has a sharp nib it can dent the flowers if they are still a bit tacky....so patience is the name of the game here (see point 1 above).

I finished the flowers with a dot of white in the centre. They look pretty cute, but the steadiness when using my left hand was questionable!! Painting nails with my left hand is fine, but writing/outlining details with a pen is another matter. ...and for this reason I would take Blue Peter's advice and get a grown-up to help you!


Not bad for a first attempt, but practice makes perfect!

* Revlon's nail enamels are currently on offer in Boots £2 off - so it's worth grabbing them while the offer is on
** Boots are giving away free gift of Barry M Lash Vegas Mascara when you spend £9 or more on Barry M cosmetics.

Disclaimer: I'm not promoting boots - but I love a beauty bargain, so always worth a share. 
Posted by Unknown On 12:46 No comments READ FULL POST

25 May 2013

I can't take credit for this amazing pop art manicure as I was treated to it by Fashion graduates from Southampton Solent University. For those who don't know, I've recently moved jobs to be their Digital PR Officer. The graduating fashion students have organised Southampton Fashion Week (SFW), an entire week of Fashion events, demonstrating the wide skill sets across all of the varied fashion courses at Solent University

As part of SFW, I was invited to the launch of an exclusive fashion careers magazine Aspire, with industry specialist speakers, and a cheeky popup nail and lash bar. It would have been rude not to get involved - so recent BA (Hons) Fashion Styling graduate Bianca Richards gave me a cute 'pop art' inspired manicure, using the new Barry M nail art pens (£4.99), they come in black, white, pink and silver. 

The pen-like nib makes it so easy to paint on detailed designs, you just need to wait until the polish is fully dry before designing. So I'm off to get some pens and start doodling - designs to follow.....
Posted by Unknown On 11:03 No comments READ FULL POST

19 March 2013

I'm a big fan of nail polish and it's really exciting to see all of the new beauty tech out there at the moment meaning that we can try out the latest trends at home without the expensive salon prices.

Today I'm going to try out a magnetic manicure using Barry M's Instant Nail Effects in Magnetic Blue (£4.99). Each metallic colour comes with a different magnet design in the cap of the bottle, so the pattern is dependent on the colour that you get. Magnetic Blue comes with what looks like a Picasso Union Jack pattern

The bottle comes with instructions, so I thought I'd set the blog post out according to those steps:
1. Shake the bottle well to ensure magnetic particles are evenly distributed throughout nail paint - Done!


2. Apply a basecoat and then apply one coat of your magnetic nail paint and allow to dry
The first coat has a lovely metallic look to it on its own, so it's also good to know that you can get two looks out of this bottle, it comes out a bit paler than what the polish looks like in the bottle, but you have to brush it quickly as the metallic particle can make the polish appear a bit streaky if not applied evenly.


3. Apply second coat and IMMEDIATELY hover the magnet over the nail for 5 to 10 seconds and watch the effect appear
The lid has a ridge on it so you can rest it on your finger so it doesn't touch the nail and can hover over. Pretty handy, but I discovered that on the smaller nails you need to move the ridge further down your finger to ensure that the pattern appears in the centre of the nail.


So I was very impressed with the effect of the magnetic print, the pattern magically appeared and looked very cool.

4. Once dry apply topcoat

Sadly the top coat blurred the magnetic effect, which is a real shame! The shape of the magnetic pattern is still visible, but the wow effect has been lost, as you can see they still look cool, but not as good as they did before the top coat.

However this may be because of my topcoat as it is a super strength one, maybe just using a clear varnish would be fine, but it wouldn't provide the resilience of a top coat.

In order to get the most out of the magnetic effect nails, I wouldn't recommend using a top coat and just plan to have them for only one night/day, (rather than doing a top coat to make them last a long time).....in the word of Kurt Cobain "It's better to burn out, than fade away" - ok, I NEVER thought I'd manage to get Kurt Cobain into a beauty blog!!!!

The cool thing about the different patterns on the magnets is that you can collect the whole range to mix and match colours and effects.


Posted by Unknown On 22:36 No comments READ FULL POST

9 March 2013

In the pursuit of a nail polish to rival a gel manicure I came across the Barry M Gelly Hi-Shine (£3.99) nail colours, which look good enough to eat! They come in 13 fruity shades and I have the scrummy looking 'Blueberry' and 'Satsuma', the latter is a vibrant orange, almost neon, but the blueberry is more of a cute pastel blue.

I did get a bit excited about the 'gel' element of the product, thinking it potentially had magical non-UV setting properties, but Barry M's Hi-Shine Gel effect Nail Paint just provides an extra glossy finish which has the look of a gel manicure.

Barry M Gelly Hi-Shine in 'Blueberry'
I have to admit, on the first application, I used a friend's basecoat of a brand I'd never heard of before and by the next morning they began to peel off, but in complete chunks almost like stickers.  The peeling was incredibly frustrating, as I was running late anyway, and had to remove (luckily with the peeling, they came off in seconds!) I think however this may have been the dodgy basecoat, as on second application later that evening they lasted a good 6 days.

Barry M Gelly Hi-Shine in 'Satsuma'


The collection of colours are gorgeous, and they have a great shine to them which really stays, so I couldn't resist doing an arty wet gel shot on the Satsuma polish (below).


My only comment would be that as the consistency is similar to a gel, areas that are thinly spread tend to show as slightly darker patches which are hard to hide with a second coat. So unlike usual polish application (where I would do a very thin bottom coat as a base for the next coat to latch on to, followed by a thicker second coat), with the Gelly Hi-Shine I found that each coat needs to be a full covering.  This takes a little longer to dry between coats, but worth it for the overall effect.

Now to collect the rest of the set.....
Posted by Unknown On 20:01 No comments READ FULL POST
  • Twitter
  • Facebook
  • Youtube
  • googleplus

Contact Me / PR


Drop me an email facefactsblog@gmail.com

    Blogger news

    Blogroll

    About